Node.js is an open-source, cross-platform JavaScript runtime environment. It’s the technology that is used to create and host various web-based applications. Some of the programmers also used run and install node js on shared hosting server to build web servers and networking tools.
In this article, you will find the steps to install node.js on vps hosting server on the CentOS operation system with cPanel installation. The same process or steps can be applied to another operating system such as Linux based OS.
For the CentOS operation system, first of all, you need to access the server via SSH as the root user. If you are using a UNIX based operating system then you easily run the terminal.
The following command is used to access the SSH.
ssh root@serverip -pPORT
In the above command, there are some values that you need to put
- Server IP– It is the IP address of your dedicated server or VPS
- PORT– port no -22.
Install Node.js through PuTTY:
The PuTTY SSH client is also used to install node.js on VPS hosting server:
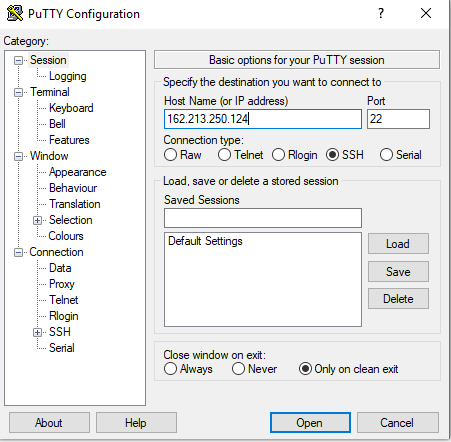
First thing you need to open PuTTY to start the configuration screen. For that configuration you need to fill out the following fields:
- Host Name: In that field, you need to enter the IP of the server;
- Port: your server’s port that will be 22 (by default);
- Connection type: select the type of connection that is SSH.
It will look like this following window:
Step 2:
Now, PuTTY “Security Alert” screen will appear at the first time of connection. Now click on Yes button:
After that, you will see the SSH login screen.
Step 3:
Now you need to login by using username and password.
- Enter your username which is root and press Enter
- Enter your root password and press the Enter
By Performing these three steps login process you will be into your SSH server. From here, you can install node.js on VPS hosting server
Step 4:
Now you need to download Node.js version that is 10 LTS in your root home directory, For that type the following command:
cd ~
wget https://nodejs.org/dist/v10.16.3/node-v10.16.3-linux-x64.tar.xz
You can download any version of node.js to install node.js on your VPS hosting server.
Step 5:
Now it is time to extract the downloaded node.js version. For that you can use the following command:
tar xvf node-v10.16.3-Linux-x64.tar.xz
Step 6:
In the above command, you need to replace the node-v10.16.3-linux-x64.tar.xz with the name of the node.js version that you have downloaded.
Step 7:
Now rename the extracted folder with nodeext with following command:
mv node-v10.16.3-linux-x64 nodeext
Step 8:
Now you can install the node and npm by using the following commands:
mkdir ~/bin
cp nodeext/bin/node ~/bin
cd ~/bin
ln -s ../nodeext/lib/node_modules/npm/bin/npm-cli.js npm
Step 9:
Then node.js and NPM will appear on the server. You can check the version of node.js and also check node.js installed properly or not.
node –version
npm –version
How to Run Node.js Apps
There are various ways to run node.js on cheap hosting vps server. In this article you will find the installation of Node.js and NPM on the server.
The following command is used to install node js in vps hosting that is production-ready and include package.json file.
nohup npm start –production &
If you are running Node.js application and that does not have package.json file included. For that you can use the following command:
nohup node my_app.js &
How to stop Node.js application
If you want to stop Node.js applications, for that you can use the following command via SSH:
pkill node
This above command will kill any node.js processes that are running on the server node.js VPS hosting
How to Connect your Website with a Running Node.js
If you want to connect your website with running node.js applications then to need to follow this process.
- Open your cPanel account and then go to File Manager>> public_html folder.
- Now you need to click on the Settings options that is on the upper-right and you need to make sure that the option “Show Hidden Files (dotfiles)” should be checked. After that click on the Save button.
- Here you need to click on the “.htaccess file” in the folder and click on Edit:
If .htaccess file does not exist then you need to create it by using the “+ File” option that is on the upper-left side and then creates the file.
- Now you need to enter the following code:
DirectoryIndex disabled
RewriteEngine On
RewriteRule ^$ http://127.0.0.1:XXXXX/ [P,L]
RewriteCond %{REQUEST_FILENAME} !-f
RewriteCond %{REQUEST_FILENAME} !-d
RewriteRule ^(.*)$ http://127.0.0.1:XXXXX/$1 [P,L]
Now, you need to replace XXXXX with the port your Node.js application is working on.
- Finally, click on Save Changes that is on the upper-right.
Final Thoughts:
In this article, we have seen the steps to install node.js vps hosting server, how to run and stop node.js applications with very simple steps.